|
to our website |

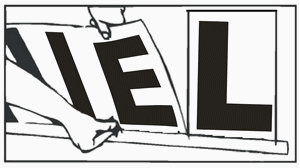
CREATE YOUR OWN SIGNS WITH PROFESSIONAL RESULTS |


 |
 Quality Made in the USA |
Possible Uses:
Automotive Decals
Banners
Boat Lettering
Business Signs
Domain Name Decals
Door Lettering
DOT Numbers
Equipment Decals
Ham Radio Call Signs
Home decor
Jet-Ski Lettering
Magnetic Blanks
Number Decals
Personalized Name
PWC Lettering
Racing Decals
Real Estate Signs
Safety Signs
Shop Signs
Snowmobile Decals
Storefront Signs
Street Signs
Truck Lettering
Truck Numbers
Wall Lettering
Warning Signs
Web Address Decals
Window Lettering
Yard Signs
Visit Our 20th Century Site
|
Quality Made in the USA |
Possible Uses:
Automotive Decals
Banners
Boat Lettering
Business Signs
Domain Name Decals
Door Lettering
DOT Numbers
Equipment Decals
Ham Radio Call Signs
Home decor
Jet-Ski Lettering
Magnetic Blanks
Number Decals
Personalized Name
PWC Lettering
Racing Decals
Real Estate Signs
Safety Signs
Shop Signs
Snowmobile Decals
Storefront Signs
Street Signs
Truck Lettering
Truck Numbers
Wall Lettering
Warning Signs
Web Address Decals
Window Lettering
Yard Signs
Visit Our 20th Century Site
Vinyl Application Instructions
Things you will needA squeegee can be helpful with vinyl application. If you don’t have a squeegee, a credit card, drivers license or a stiff piece of cardboard folded in half can be used in it’s place. Application Fluid Recipe: Place the smallest drop of dishwashing liquid into 1 cup (8 Oz.) of water. Mix well. It would be handy but not necessary to place the mixture in a spray bottle. You can purchase application fluid and a squeegee on our Vinyl Application Products Page. For easy application letters come as prespaced lines of text.
The decal is like a sandwich made of 3 layers:
The top layer is the transfer tape (kind of like wide masking tape).
The middle layer is the vinyl graphic, this is the finished decal.
The bottom layer is the backing, it is attached to the sticky side of the decal.The idea is you lift the vinyl decal from the backing film using the transfer tape.
Then apply to your surface and then remove the transfer tape.
If you follow the instructions below you will find vinyl application to be quick and easy.Click HERE for printable version of this page or download a PDF version of this page HERE
Take your time when applying vinyl graphic decals. Most problems occur when you get distracted.
All surfaces should be clean and wax free. Recommended surface temperature is 55° to 75°. Freshly painted surfaces must be allowed to dry fully.Vinyl does not adhere well to porous surfaces such as concrete or unfinished wood.
Application fluid is recommended for wrinkle and bubble free installation. Some "seasoned pros" will do a "dry application" skipping the use of application fluid. We do not recommend this unless you are experienced with vinyl application. The application fluid makes the application almost foolproof.
Application fluid is not required for application to interior walls unless a glossy finish has been applied to the wall.
Ok here we go just follow these steps.1. Tape the graphic into position with small pieces of masking tape. Make sure the graphic is level and positioned exactly where you want it. 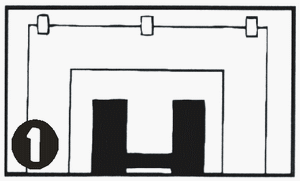
2. Apply masking tape across the bottom edge to serve as a hinge. Remove the tape from the top edge and allow the graphic to fold downward at the tape hinge. 
3. Carefully remove the backing. (save it for the last step) If the vinyl sticks to the backing, try peeling from another direction or use a pin or knife blade to help it separate. Flood the sticky vinyl surfaces with fluid making sure not to leave any dry spots. 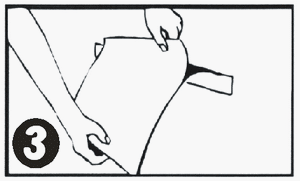
4. Carefully squeegee the graphic on to the surface, forcing out the application fluid and air bubbles. Remove the tape hinge and firmly squeegee in all directions to remove bubbles and any remaining fluid. Wait a few minutes for the fluid to dry. 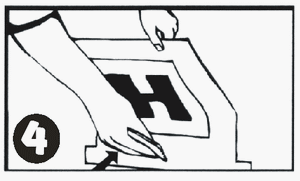
5. Remove the transfer tape by pulling it back 180 degrees. (fold it back on itself) If the the graphic starts to lift from the surface replace the transfer tape and re-squeegee. Some surfaces require more time to dry. After the transfer tape is removed, place the backing over the graphic, slippery side out and squeegee once more to remove any remaining bubbles and insure proper adhesion. 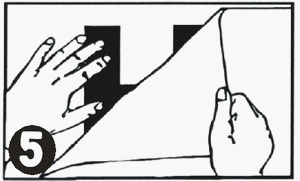
Long lines of text can be separated by carefully cutting between the letters after step 2 to make application more manageable. Bubbles in the vinyl can be removed by poking with a pin and then working out the air.
A small pin hole will not be noticeable. Small bubbles will usually dissipate on their own.HOW TO REMOVE VINYL
The vinyl is removable, however; it may not be reused or repositioned. Heat with a blow dryer, then simply lift an edge with your fingernail and slowly peel off the sticker.
SignDecals.com
Toll Free
In New York